
A lot of website owners get used to cPanel when managing sites. One of the challenges of moving to a self-managed VPS like Digital Ocean or Vultr is finding a graphical interface to manage your server. For managing sites I use Webmin (installation guide for Ubuntu and Debian). I use nginx for all my WordPress sites so I wanted a way to manage the virtual hosts and easily disable and enable separate sites.
I found Justin Hoffman’s nginx Webmin module and it came very close to suiting my needs. There were some features that I wanted to add so I contacted Justin and sponsored these new features so everyone using nginx (including EasyEngine users) can enjoy them :).
New Webmin nginx module features added
- Ability to disable and enable virtual hosts
- Display the domain name in the column
- Display the document root
- Allow an easy way to access the URL of the virtual host
- Feedback to Apply changes
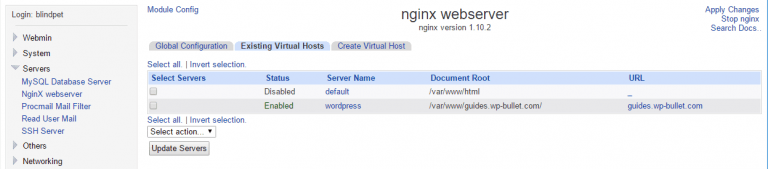
Here is how the new and improved nginx Webmin module looks now after Justin and I worked on it.
Install nginx Webmin Module
Go download the nginx.tar.gz file from Justin’s download page
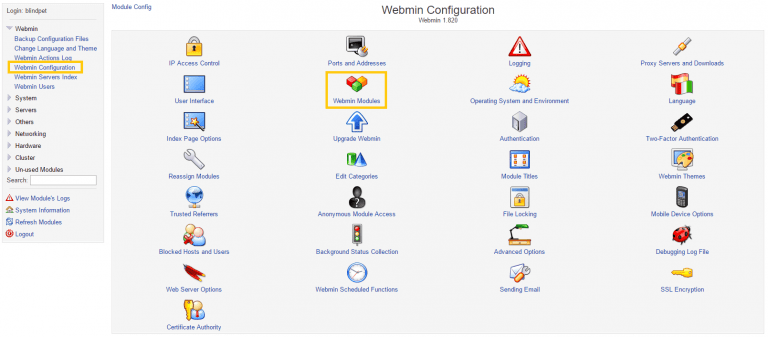
Log into Webmin and in the left pane navigate to Webmin > Webmin Configuration
Click Webmin Modules
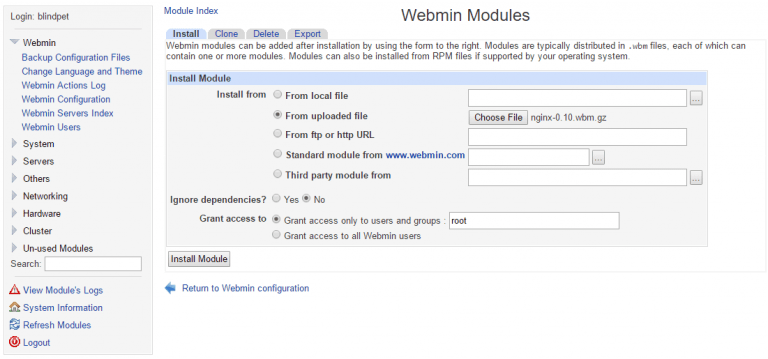
Select From uploaded file and then click Choose File and browse to the nginx-0.11.wbm.gz file.
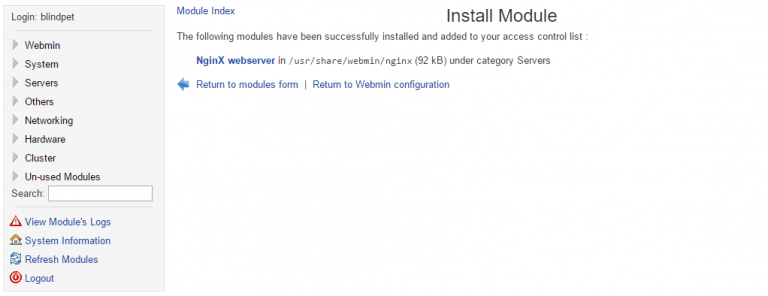
Click Install Module
You may need to restart Webmin for the NginX webserver menu item to show up under Servers.
sudo service webmin restartNow if you click NginX webserver it will take you to the module screen
Using nginx Webmin Module
The nginx Webmin module shows the existing virtual hosts.
The Status column shows if the virtual host is currently enabled or not.
The Server Name column shows the virtual host name, clicking will open up the nginx virtual host for editing.
The Document Root shows the root folder of the virtual host
The URL column provides a hyperlink to open the website in a new tab.
To disable or enable a virtual host you can check the box under Select Servers and use the Select action dropdown.
Then click Update Servers and then click Apply Changes.
You can use the Global Configuration tab to modify the /etc/nginx/nginx.conf file.
In the Create Virtual Host tab you can create new virtual hosts.
Hi,
Tried to install this on webmin 1.831 on Debian 7 and that yields the following error message when trying to use the NginX module:
Error – Perl execution failed
Can’t locate HTML/Entities.pm in @INC (@INC contains: /usr/share/webmin /etc/perl /usr/local/lib/perl/5.14.2 /usr/local/share/perl/5.14.2 /usr/lib/perl5 /usr/share/perl5 /usr/lib/perl/5.14 /usr/share/perl/5.14 /usr/local/lib/site_perl . /usr/share/webmin/) at /usr/share/webmin/nginx/index.cgi line 5. BEGIN failed–compilation aborted at /usr/share/webmin/nginx/index.cgi line 5.
Could this be an incompatibility issue with my webmin version?
Interesting, it could mean perl needs updatin I supposed. I do have a Debian 7 box running the latest webmin though.
Error – Perl execution failed
Can’t locate HTML/Entities.pm in @INC (@INC contains: /usr/libexec/webmin /usr/local/lib64/perl5 /usr/local/share/perl5 /usr/lib64/perl5/vendor_perl /usr/share/perl5/vendor_perl /usr/lib64/perl5 /usr/share/perl5 . /usr/libexec/webmin/) at /usr/libexec/webmin/nginx/index.cgi line 5. BEGIN failed–compilation aborted at /usr/libexec/webmin/nginx/index.cgi line 5.
Hi Atlas, can you remove it and try again? I have it working as of a few days ago.
Seems to have to be together with Virtualmin…
Are you using Virtualmin? I am only using Webmin and module is working on fresh servers running Debian 9 and Ubuntu 16.04. Did you install Webmin using the repository?
I am using Webmin only, before installed virtualmin, I installed nginx module in two centos and can not make them run.
Maybe Virtualmin wasn’t completely uninstalled?
I find out that “The module requires html::entities perl module and libhtml-parser-perl.”
after I installed “perl-HTML-Entities-Numbered” and “perl-libwww-perl” (CentOS7), it works!
The answer on CentOS 7 is installing these two modules as mentioned above. Thank you @Atlas Wu.
47 sudo yum install perl-HTML-Entities-Numbered
48 sudo yum install perl-libwww-perl
It says the module was installed under Servers, but I don’t see it there or in any other category. I can search for it, so I know it exists, but how can I get it to show in the menu on the left?
With newer versions of webmin, it appears you have to restart webmin 🙂
just to let you know that the module doesn’t work!
I have the last version of webmin, installed as you said, the module appears in the servers list on the left column, but as I click nginx nothing happens. I have ubuntu 16.04
Hi Antonio! I just tried this on Debian 9 and it is working with the latest Webmin under Servers > NginX Web server, can you run a dry run test on virtual machine?
Same here!
Did you find a solution? Any clean and simple nginx gui alternative?
Thanks
Restart webmin afterwards and it will show up under Servers António Lourenço and cuginoAle 🙂
It shows up but nothing happens. Using Webmin 1.880
Hey Corey, can you elaborate on ‘nothing happens’ when you get a chance? On my fresh Debian 9 box I am using it right now to modify vhosts so something is happening on my end.
Sure. Also using a fresh Debian 9 box. Basically I install the module from the link above and after restarting Webmin, I can see NGINX in the Servers but when I click on the click, it never changes pages or show anything related the web server. Basically nothing loads.
After opening the link up in a new tab, it showed me the error that was actually going on and I was able to fix it by using apt-get install libhtml-parser-perl
I hope that helps others.
That worked for me.
Tried to use this, seems to hold a lot of promise, albeit didn’t work for me using Ubuntu 18.04 on Vultr VPS.
That is exactly the configuration I used for this test, may want to check the comment below by Patrick who found a bug in the perl module
Thank you so much for the convenience.