
The default WordPress search uses MySQL which is not search-optimized and can be slow. Elasticsearch is a NoSQL database which uses a lucene structure. The goal of Elasticsearch is to provide search results in real time. ElasticPress is the plugin that integrates WordPress with ElasticSearch to make WordPress searching fast and awesome. It extends WordPress search capability by including meta, taxonomy, and author searches. I saw the WordCamp talk by Taylor from 10up and was hooked.
WordPress.com uses Elasticsearch extensively as well, so you can get the same search power by self-hosting Elasticsearch since it is free and open source hosted on github.
This tutorial will show you how to install and configure Elasticsearch for WordPress on your VPS like Digital Ocean or Dedicated server. If you don’t want to host your own Elasticsearch then you can pay Elastic to host it for you.
WooCommerce users there is an equivalent post here for you. If you are on CentOS see this guide.
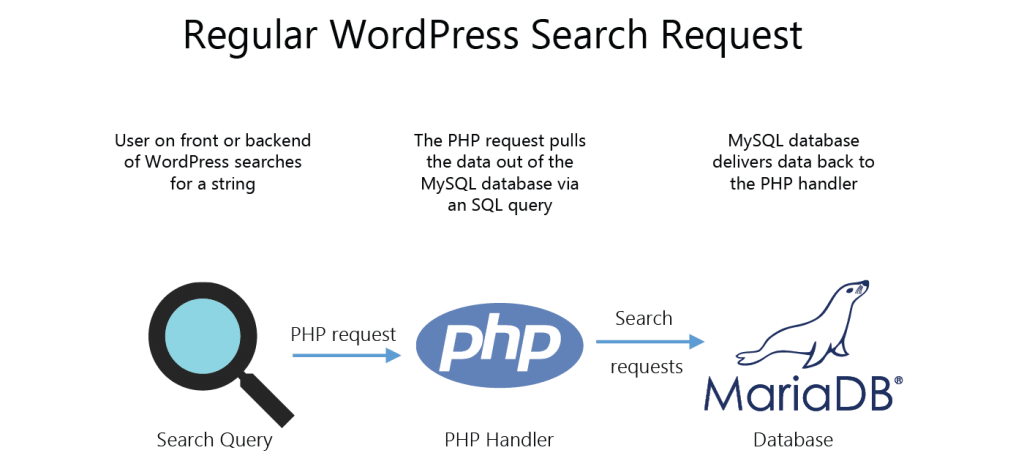
This simple diagram shows how WordPress search normally works. Somebody has a query and the PHP handler goes in to MySQL to search for keywords. If you have a large number of posts or pages then you have likely experienced this as slow.
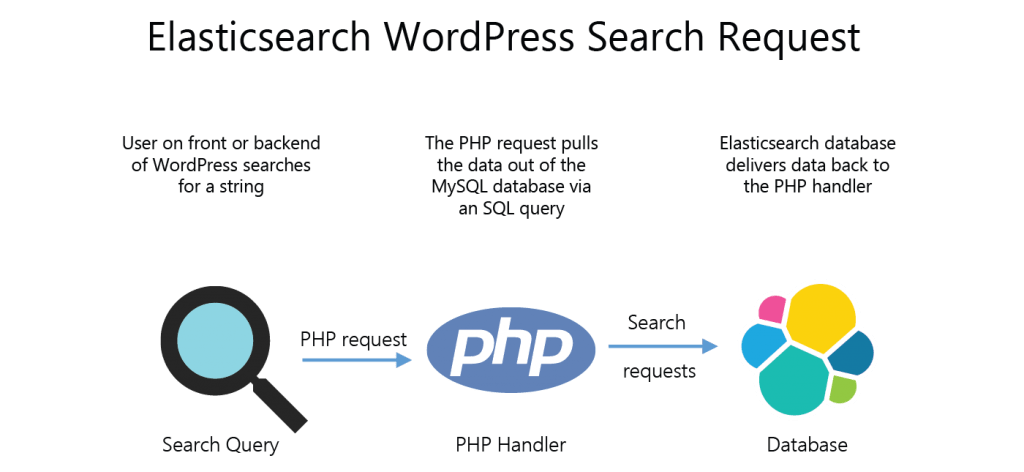
This diagram shows how WordPress with Elasticsearch works. First you let ElasticPress index the MySQL database into Elasticsearch. Then WordPress searches will call the PHP handler to use the blazingly fast Elasticsearch thanks to ElasticPress hooking into WP_Query.
Install + Configure Elasticsearch to Speed up WooCommerce Search
Elasticsearch is written in Java so we need to install that first. This is for Debian and Ubuntu.
echo "deb http://ppa.launchpad.net/webupd8team/java/ubuntu trusty main" | sudo tee -a /etc/apt/sources.list.d/webupd8team-java.list
echo "deb-src http://ppa.launchpad.net/webupd8team/java/ubuntu trusty main" | sudo tee -a /etc/apt/sources.list.d/webupd8team-java.list
sudo apt-key adv --keyserver hkp://keyserver.ubuntu.com:80 --recv-keys EEA14886
sudo apt-get update
sudo apt-get install oracle-java8-installer -y
Accept Oracle’s terms when prompted.
If you have problems with the Oracle package then use openjdk
sudo apt-get install openjdk-8-jdk -yInstall Elasticsearch
Grab the Elasticsearch repository key, add the repository, update and install Elasticsearch
sudo apt-get install apt-transport-https -y
wget -qO - https://packages.elastic.co/GPG-KEY-elasticsearch | sudo apt-key add -
echo "deb https://packages.elastic.co/elasticsearch/2.x/debian stable main" | sudo tee -a /etc/apt/sources.list.d/elasticsearch-2.x.list
sudo apt-get update
sudo apt-get install elasticsearch -y
Enable the Elasticsearch startup service so it will autostart on boot.
sudo update-rc.d elasticsearch defaults 95 10Configure Elasticsearch for WordPress
Back up the default Elasticsearch configuration
sudo mv /etc/elasticsearch/elasticsearch.yml /etc/elasticsearch/elasticsearch.yml.bakCreate a fresh Elasticsearch configuration for WordPress.
sudo nano /etc/elasticsearch/elasticsearch.ymlThis is a simple Elasticsearch configuration for a single node cluster that listens on the loopback interface for security.
If you are using Elasticsearch on a separate server I’d recommend using nginx as a reverse proxy for SSL so your post data is encrypted.
cluster.name: wordpress
node.name: wpbullet
network.host: 127.0.0.1
http.port: 9200
node.max_local_storage_nodes: 1
Restart the Elasticsearch service to enable the configuration
sudo service elasticsearch restartLet’s make sure Elasticsearch is running on the loopback interface (127.0.0.1), note that it can take up to 10 seconds or so for the Elasticsearch daemon to fully start up.
sudo netstat -lntpYou should see a java program (Elasticsearch) listening on port 9200
tcp        0      0 127.0.0.1:9200          :::*                    LISTEN      10216/java
tcp        0      0 127.0.0.1:9300          :::*                    LISTEN      10216/java
tcp6       0      0 127.0.0.1:9200          :::*                    LISTEN      10216/java
tcp6       0      0 127.0.0.1:9300          :::*                    LISTEN      10216/java
Let’s make sure Elasticsearch is using the configuration we just made
curl -X GET http://localhost:9200/You’ll see this output showing the name of the node and the cluster name.
{
  "name" : "wordpress",
  "cluster_name" : "wpbullet",
  "version" : {
    "number" : "2.3.3",
    "build_hash" : "218bdf10790eef486ff2c41a3df5cfa32dadcfde",
    "build_timestamp" : "2016-05-17T15:40:04Z",
    "build_snapshot" : false,
    "lucene_version" : "5.5.0"
  },
  "tagline" : "You Know, for Search"
}
Configure WordPress to use ElasticSearch
Disable any object caching like memcached or Redis – you could get php loops which crash your server!
My forked version of Memcached is your friend will not cause any php loops (source).
To enable Elasticsearch for WordPress, install ElasticPress (hosted on github) made by 10up.

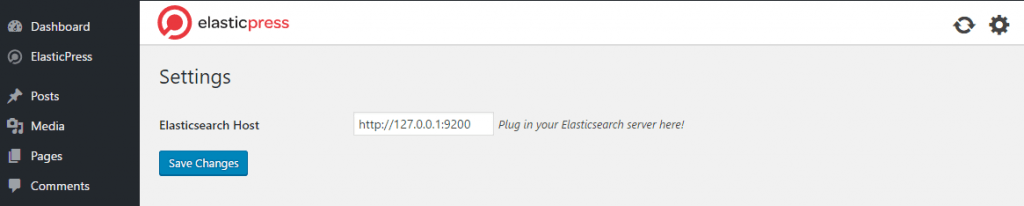
After enabling ElasticPress you can create the Elasticsearch index by going to the ElasticPress and clicking the Gear icon.
Set the Elasticsearch Host to http://127.0.0.1:9200 and click Save Changes.
Click ElasticPress in the Admin sidebar again to see the Elasticsearch integration options.
I recommend Activating Search and Admin.
The Related posts will add a small widget at the bottom of your posts.
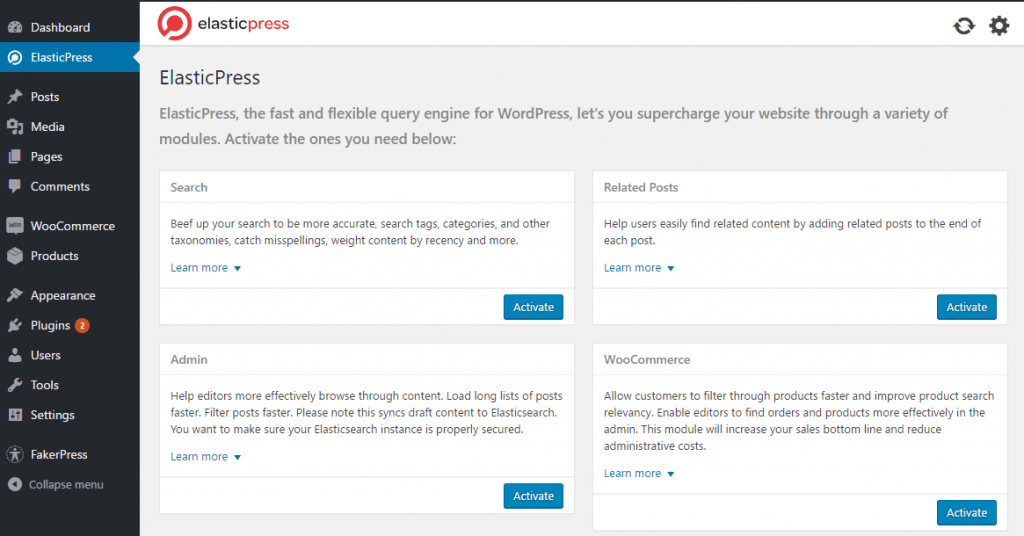
To start the Elasticsearch index process click the Refresh icon in the top right.
If you get any timeouts or errors when running the index then use WP-CLI instead, you can install WP-CLI easily
sudo wget -q https://raw.githubusercontent.com/wp-cli/builds/gh-pages/phar/wp-cli.phar -O /usr/bin/wp
sudo chmod 755 /usr/bin/wp
Then enter your WooCommerce installation folder
cd /var/www/wp-bulletYou can define the ElasticPress Elasticsearch host in wp-config.php
// ElasticPress Host
define( 'EP_HOST', 'http://127.0.0.1:9200' );
Use this command to create the WooCommerce Elasticsearch index.
wp elasticpress index --setup --allow-rootOn a DigitalOcean VPS it took about 10 minutes for ElasticPress to index 78000 posts.
Processed 77000/78364 entries. . .
Processed 77350/78364 entries. . .
Processed 77700/78364 entries. . .
Processed 78050/78364 entries. . .
Processed 78364/78364 entries. . .
Number of posts indexed on site 1: 78364
Total time elapsed: 756.411
Warning: ElasticPress is already activated.
Success: Done!
After you run the initial index, Elasticsearch will be updated automatically when you make changes to posts and pages. You do not need to re-index periodically or anything like that to keep your Elasticsearch index updated.
You will get faster WordPress search results with Elasticsearch, enjoy 🙂
Hello,
thank you for the very good tutorial, I followed your guide and get elasticsearch working except autosuggest, I activated this feauter but the status is yellow. Do you have any advice how I can get it worked on my nginx server. Thank you.
Elasticsearch with ElasticPress really does help WooCommerce stores.