
The default WordPress search uses MySQL which is not search-optimized and can be slow due to the structure of some WordPress and WooCommerce tables. Elasticsearch is a NoSQL database which uses a lucene structure with the goal of providing search results in real time. The ElasticPress plugin integrates WordPress with Elasticsearch to make WordPress searching awesomely fast. ElasticPress extends WordPress search capability by including meta, taxonomy, and author searches. I saw the WordCamp talk by Taylor from 10up and was hooked.
WordPress.com uses Elasticsearch extensively, so you can get the similar search power by self-hosting Elasticsearch since it is free, open source and hosted on github.
This tutorial will show you how to install and configure Elasticsearch for WordPress on your VPS like Digital Ocean or Dedicated server running CentOS. If you don’t want to host your own Elasticsearch then you can pay Elastic to host it for you.
If you are on Ubuntu or Debian use this guide.
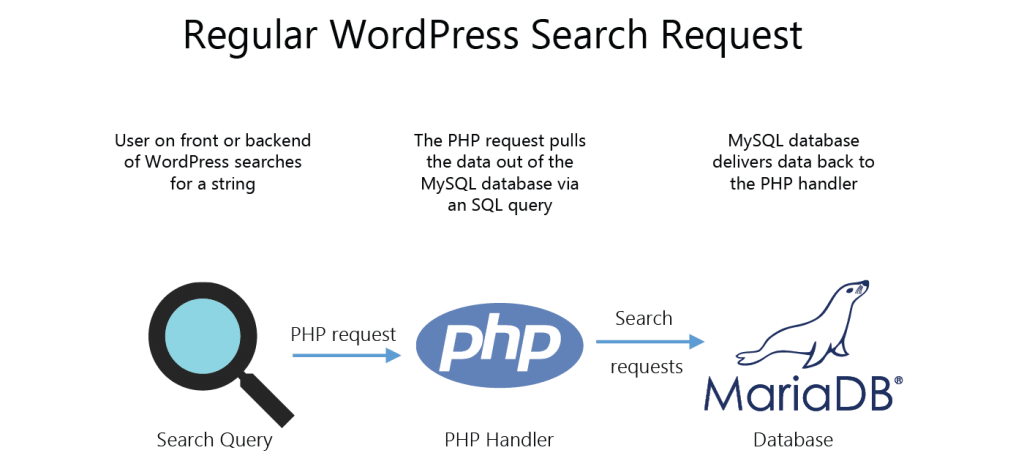
This diagram shows how WordPress search normally works. Somebody has a query and the PHP handler goes in to MySQL to search for keywords. If you have a large number of posts or pages then you have likely experienced this as slow.
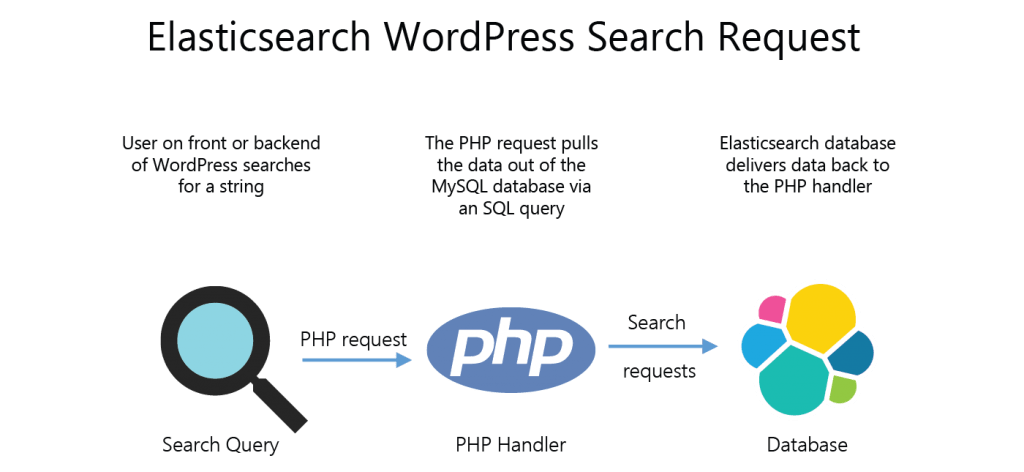
This diagram shows how WordPress with Elasticsearch works. After ElasticPress has indexed your MySQL database into your Elasticsearch index, WordPress searches will use Elasticsearch thanks to ElasticPress hooking into WP_Query.
Install + Configure Elasticsearch to Speed up WordPress CentOS
Installation overview
- Install Elasticsearch on CentOS
- Configure the ElasticPress plugin
Install Elasticsearch
Install Java
yum install java-*-openjdk-headless.x86_64 -yCreate the Elasticsearch repository
sudo nano /etc/yum.repos.d/elasticsearch.repoPaste this which includes the repository and key.
[elasticsearch-2.x]
name=Elasticsearch repository for 2.x packages
baseurl=https://packages.elastic.co/elasticsearch/2.x/centos
gpgcheck=1
gpgkey=https://packages.elastic.co/GPG-KEY-elasticsearch
enabled=1
This will install Elasticsearch on CentOS
sudo yum install elasticsearchEnable the Elasticsearch service so it autostarts on boot, then start it
systemctl enable elasticsearch
service elasticsearch start
Configure Elasticsearch for WordPress
Back up the default Elasticsearch configuration
sudo mv /etc/elasticsearch/elasticsearch.yml /etc/elasticsearch/elasticsearch.yml.bakCreate a fresh Elasticsearch configuration for WordPress.
sudo nano /etc/elasticsearch/elasticsearch.ymlThis is a simple Elasticsearch configuration for a single node cluster that listens on the loopback interface for security.
If you are using Elasticsearch on a separate server I’d recommend using nginx as a reverse proxy for SSL so your post data is encrypted.
cluster.name: wordpress
node.name: wpbullet
network.host: 127.0.0.1
http.port: 9200
node.max_local_storage_nodes: 1
Restart the Elasticsearch service to enable the configuration
sudo service elasticsearch restartLet’s make sure Elasticsearch is running on the loopback interface (127.0.0.1), note that it can take up to 10 seconds or so for the Elasticsearch daemon to fully start up.
sudo netstat -lntpYou should see a java program (Elasticsearch) listening on port 9200
tcp        0      0 127.0.0.1:9200          :::*                    LISTEN      10216/java
tcp        0      0 127.0.0.1:9300          :::*                    LISTEN      10216/java
tcp6       0      0 127.0.0.1:9200          :::*                    LISTEN      10216/java
tcp6       0      0 127.0.0.1:9300          :::*                    LISTEN      10216/java
Let’s make sure Elasticsearch is using the configuration we just made
curl -X GET http://localhost:9200/You’ll see this output showing the name of the node and the cluster name.
{
  "name" : "wordpress",
  "cluster_name" : "wpbullet",
  "version" : {
    "number" : "2.3.3",
    "build_hash" : "218bdf10790eef486ff2c41a3df5cfa32dadcfde",
    "build_timestamp" : "2016-05-17T15:40:04Z",
    "build_snapshot" : false,
    "lucene_version" : "5.5.0"
  },
  "tagline" : "You Know, for Search"
}
Configure WordPress to use ElasticSearch
Disable any object caching like memcached or Redis – you could get php loops which crash your server!
My forked version of Memcached is your friend will not cause any php loops (source).
To enable Elasticsearch for WordPress, install ElasticPress (hosted on github) made by 10up.

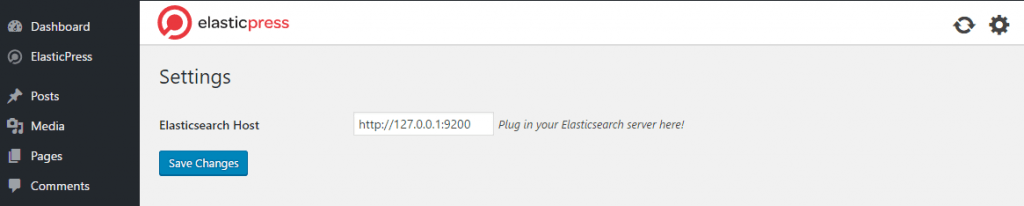
After enabling ElasticPress you can create the Elasticsearch index by going to the ElasticPress and clicking the Gear icon.
Set the Elasticsearch Host to http://127.0.0.1:9200 and click Save Changes.
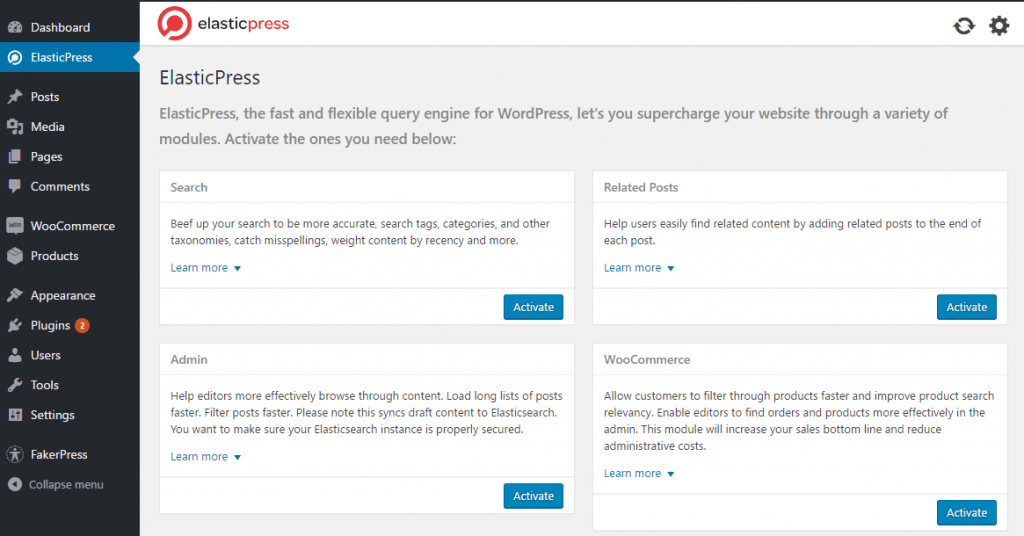
Click ElasticPress in the Admin sidebar again to see the Elasticsearch integration options.
I recommend Activating Search and Admin.
The Related posts will add a small widget at the bottom of your posts.
To start the Elasticsearch index process click the Refresh icon in the top right.
If you get any timeouts or errors when running the index then use WP-CLI instead, you can install WP-CLI easily
sudo wget -q https://raw.githubusercontent.com/wp-cli/builds/gh-pages/phar/wp-cli.phar -O /usr/bin/wp
sudo chmod 755 /usr/bin/wp
Then enter your WooCommerce installation folder
cd /var/www/wp-bulletYou can define the ElasticPress Elasticsearch host in wp-config.php
// ElasticPress Host
define( 'EP_HOST', 'http://127.0.0.1:9200' );
Use this command to create the WooCommerce Elasticsearch index.
wp elasticpress index --setup --allow-rootOn a DigitalOcean VPS it took about 10 minutes for ElasticPress to index 78000 posts.
Processed 77000/78364 entries. . .
Processed 77350/78364 entries. . .
Processed 77700/78364 entries. . .
Processed 78050/78364 entries. . .
Processed 78364/78364 entries. . .
Number of posts indexed on site 1: 78364
Total time elapsed: 756.411
Warning: ElasticPress is already activated.
Success: Done!
After you run the initial index, Elasticsearch will be updated automatically when you make changes to posts and pages. You do not need to re-index periodically or anything like that to keep your Elasticsearch index updated.
Great article,thanks a lot! Is it still not posible to use it with Redis Object Cache? I very much like Nginx+Php7+Redis Cache combo …Im testing the elasticpress with this setup and for now on i cant see no errors,but im scared that it might get into trouble regarding what you said about infinite php loops that may occur.Hope you can share some more insight on this topic.
All the best,keep up the good work!
Hey Minley,
Glad you found this article useful! It is possible to use with object cache but just be prepared to disable it if you encounter any issues. It is not a problem with object cache per se but usually plugins which are not coded to use object cache properly.
Thank you for your quick response Mike.Im planning on using only few crucial plugins: ElasticPress (obviously) – Autoptimize,WP All Import,CPT UI,WP-Pagenavi,Yoast SEO,and one plugin that i really need for my ecomemrce websites (the one i think may cause some troubles) –
its called WordPress Meta Data & Taxonomies Filter (MDTF) ..Basically its hierachical taxonomy chain select plugin..It keep transient cache for searches in its own table, plus im using ElasticPress integration on MDTF queries ..All in all I’ll keep my plugin list short and observe my logs for any unusual stuff. Cheers!