
Redis-server can be used for WordPress object cache to speed up transient processing. Transients are temporary data objects used by WordPress which are stored in the MySQL database by defuault. Benchmarks reveal significant performance benefits with the PHP PECL Redis extension.
This guide is for Ubuntu 16.04. It provides a secure Redis installation for WordPress after telnet exploits were discovered. No root access will be granted to Redis following this guide and it will only listen on the loopback interface 127.0.0.1 preventing outside access.
Install Redis Object Cache for WordPress PHP 7 on Ubuntu 16.04
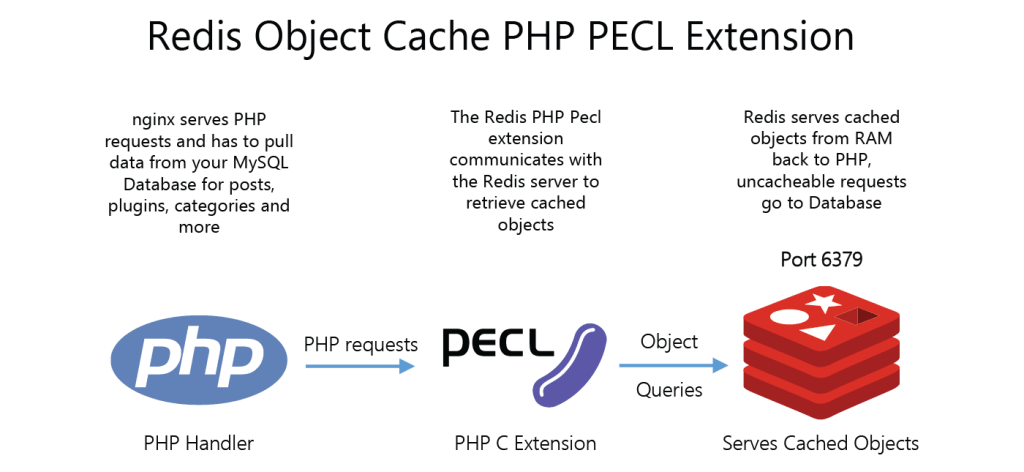
Using Redis object cache with WordPress requires two components speed boost your site
- Redis Server which stores the WordPress object cache
- Redis PHP extension (phpredis or predis) for php to communicate with the redis-server for storing and retrieving cache
phpredis is the the native c extension so is the fastest and obvious choice, the instructions for compiling from source follow the Redis server installation section.
If you prefer to use predis (redis extension written in php – (read slower)) then you do not need to install phpredis as the WordPress Redis cache plugin will default to predis.
Install Redis Server on Ubuntu 16.04
Install the essential build tools for compiling Redis
sudo apt-get update
sudo apt install build-essential -y
These commands grab the latest stable Redis, extracts, builds and installs it.
The latest Redis version number can be checked here
cd /tmp
wget https://download.redis.io/redis-stable.tar.gz
tar xzf redis*
cd redis*
sudo make
sudo make install PREFIX=/usr
sudo mkdir /etc/redis
sudo cp redis.conf /etc/redis/
cd ..
rm -R redis*
Create a Redis user without any privileges: no login, shell and limited home directory.
sudo adduser --system --group --disabled-login redis --no-create-home--shell /bin/nologin --quiet
Ensure the redis user is there by checking the shadow file
cat /etc/passwd | grep redisIf it isn’t there run the add user command again.
Now add the redis user to the www-data group so unix sockets will have the write permissons
sudo usermod -g www-data redisConfigure Redis Server
Make some changes to the redis configuration
sudo mv /etc/redis/redis.conf /etc/redis/redis.conf.bak
sudo nano /etc/redis/redis.conf
Set daemonize to yes for the systemd service.
Change bind to only listen on localhost: 127.0.0.1 to prevent serious security issues
Set maxmemory to 50M so Redis doesn’t use more than 50 MB of RAM. Even with 40 plugins I have never seen Redis use more than 20-30 MB for WordPress object caching.
Change the maxmemory-policy to allkeys-lru which forces redis-server to delete old cache (least recently used objects) when the Redis server starts to run out of memory
# create a unix domain socket to listen on
#unixsocket /var/run/redis/redis.sock
# set permissions for the socket
#unixsocketperm 775
#requirepass passwordtouse
# bind to loopback if not using over network
bind 127.0.0.1
# port for tcpsocket
port 6379
daemonize yes
stop-writes-on-bgsave-error no
rdbcompression yes
# maximum memory allowed for redis
maxmemory 50M
# how redis will evict old objects - least recently used
maxmemory-policy allkeys-lru
Ctrl+X, Y and Enter to save
Create a folder for the pid file
sudo mkdir -p /var/run/redisChange permissions so the redis user and www-data group owns it – the www-data will need access if you use unix sockets which are faster than TCP sockets.
sudo chown -R redis:www-data /var/run/redisNow Redis needs a systemd service to autostart on boot on Ubuntu 16.04.
Redis Server Systemd Script
Create the redis-server systemd script
sudo nano /etc/systemd/system/redis-server.servicePaste the Redis server systemd script
[Unit]
Description=Redis Datastore Server
After=network.target

[Service]
Type=forking
PIDFile=/var/run/redis/redis.pid
User=redis
Group=www-data
ExecStartPre=/bin/mkdir -p /var/run/redis
ExecStartPre=/bin/chown redis:www-data /var/run/redis
ExecStart=/sbin/start-stop-daemon --start --pidfile /var/run/redis/redis.pid --umask 007 --exec /usr/bin/redis-server -- /etc/redis/redis.conf
ExecReload=/bin/kill -USR2 $MAINPID
ExecStop=/usr/bin/redis-cli shutdown
Restart=always

[Install]
WantedBy=multi-user.target
Ctrl+X, Y and Enter to Save and Exit.
Enable the redis-server systemd script
sudo systemctl enable redis-serverStart the redis-server systemd script
sudo service redis-server startConfirm Redis Daemon is Secure
We are going to make sure Redis is listening on the loopback adapter and as the redis user.
First use netstat to show the listening connections
netstat -lntpFind the line containing 127.0.0.1 the loopback adapter listening on port 6379
tcp 0 0 127.0.0.1:6379 0.0.0.0:* LISTEN 11391/redis-serverYou can also make sure the Redis process is running as the redis user we specified
ps aux | grep redisIf redis said root that would be a security problem – if Redis was hacked it would have root privileges.
redis 11391 0.0 0.4 38020 2160 pts/0 Tl 21:03 0:00 /usr/bin/redis-server 127.0.0.1:6379Install phpredis PHP 7
Install php7 development tools and git
sudo apt install php7.0-dev git -yThen git clone the latest phpredis, build and install it.
cd /tmp
git clone https://github.com/phpredis/phpredis
cd phpredis
phpize
./configure
sudo make
make install
Now the Redis php7 PECL extension must be enabled for Apache or nginx
Enable Redis PHP PECL Extension for nginx
For Apache and nginx with php7.0-fpm, create the redis.ini file
sudo nano /etc/php/7.0/mods-available/redis.iniAdd this extension line
extension=redis.soCtrl+X, Y and Enter to Save and exit.
Symbolically link the redis.ini – this way it can be easily disabled
sudo ln -s /etc/php/7.0/mods-available/redis.ini /etc/php/7.0/fpm/conf.d/30-redis.ini
sudo ln -s /etc/php/7.0/mods-available/redis.ini /etc/php/7.0/cli/conf.d/30-redis.ini
Then restart php7.0-fpm
sudo service php7.0-fpm restartEnable Redis PHP PECL Extension for Apache
Create a redis.ini file for Apache
sudo ln -s /etc/php/7.0/mods-available/redis.ini /etc/php/7.0/apache2/conf.d/30-redis.ini
Add this line for the Redis extension
extension=redis.soCtrl+X, Y and Enter to Save
Then reload Apache
sudo service apache2 reloadAll that is left is to install the WordPress Redis plugin, enable it and enjoy the speed!
Future guides will be made for monitoring the Redis daemon with this tool and monitor phpredis too.
Sources
Adapted from this guide
How do I remove all this, once install? I have moved to a redis server on AWS
Hey UncleDavy,
Make sure you check latency on the redis calls, if you have a need for several GB of memory for Redis it would be ideal to use private networking. Reddit for example uses dedicated memcached instances with 8GB of RAM for its millions of users.
That said, you can remove the redis-server binary in /usr/bin, the systemd file after disabling the service (sudo systemctl disable redis-server) and configuration file /etc/redis/redis.conf
Thanks Mike. Had some free credits on AWS, so used it for redis.
My pleasure, that is usually how they get you hooked! I’d keep an eye on the bill just in case 😉
ha ha. Good tip lol
and verify if you need AWS by checking redis memory usage with redis-cli monitor https://redis.io/commands/monitor
Awesome thanks
Hey Mike, how can I update in future? I need remove the redis first?
thank you for this guide.
Just re-run when you know there is a new version available, should do the trick. To my knowledge this is the only way to get the latest and greatest version without using the Ubuntu or Debian repo :).
Sorry for bothering you..
I meet a mistake when execute this:
git clone https://github.com/phpredis/phpredis-b php7
it said that there is no php7
Can you Answer me, Thank you very much!
thank you, it looks like the branch may have been merged with master, can you try removing the
-b php7partThank you!
Yes, yesterday I also found the information of removing -b php7 part. It succeeded and installed
Hey Daniel, can you share the redis.conf you are using and the systemd file contents?
Start the redis-server systemd script
$ sudo service redis-server start
For me it doen’t work.
You should be able to start the service now with
$ sudo systemctl start redis