
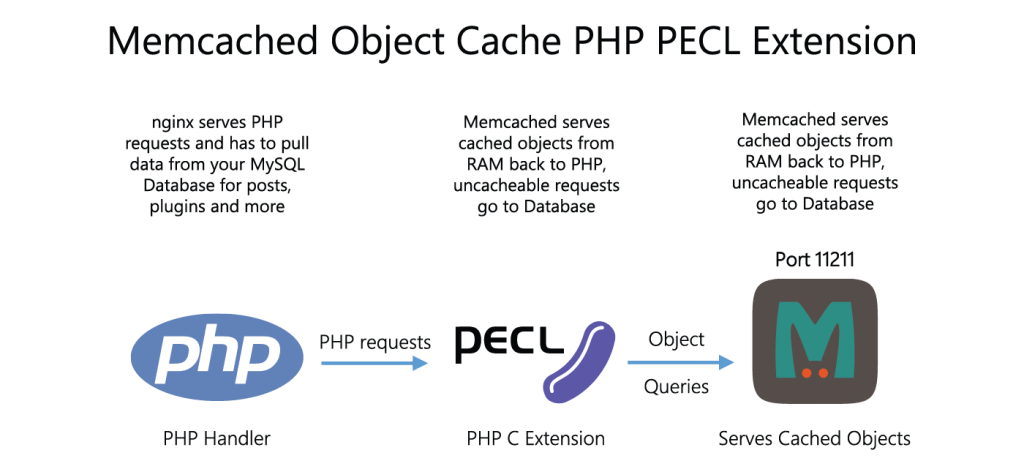
Memcached can be used to speed up WordPress and WooCommerce. Many WordPress plugins and themes use transients as settings. These transients are temporary and by default are stored in the MySQL database. This means MySQL will be used when retrieving these settings from the database stored on the hard drive. Memcached uses RAM to store these transients instead which makes retrieving them significantly faster.
Install Latest Memcached Object Cache WordPress PHP5 Debian
This is for php5, a new guide will be published for php7
Install the Memcached Daemon
Update your repository list and install libmemcached and the current version of the memcached daemon in the repository as well as the libraries and building tools for compiling the latest memcached from source.
sudo apt-get update
sudo apt-get install libmemcached* memcached libanyevent-perl libyaml-perl libterm-readkey-perl libevent-dev libsasl2-2 sasl2-bin libsasl2-2 libsasl2-dev libsasl2-modules pkg-config build-essential -y
At this point memcached is installed, but the version may not be current, you can use telnet to check
telnet 127.0.0.1 11211You will see this output on the screen
Trying 127.0.0.1...
Connected to 127.0.0.1.
Escape character is '^]'.
Enter the version command and press Enter
versionYou will see the memcached version
VERSION 1.4.21Exit the telnet session by entering quit
quitAnd leaving was successful
Connection closed by foreign host.Build the latest Memcached
This bash snippet will get the latest download link from the Memcached website, download and extract it
MEMCACHELATEST=$(wget -q https://www.memcached.org -O - | grep tar.gz | awk -F "[\"]" '{print $2}')
cd /tmp
wget -q $MEMCACHELATEST -O memcached.tar.gz
tar -xf memcached.tar.gz
Now enter the Memcached folder, build the latest memcached from source and install it. If you don’t want to use authentication then remove the –enable-sasl part
cd memcached*
./configure --prefix=/usr --enable-sasl
sudo make
sudo make install
Configure Memcached on Debian
Back up the original memcached configuration and create a new one
sudo mv /etc/memcached.conf /etc/memcached.conf.bak
sudo nano /etc/memcached.conf
Paste this memcached configuration so it listens on localhost (127.0.0.1)
# Run memcached as a daemon. This command is implied, and is not needed for the
# daemon to run. See the README.Debian that comes with this package for more
# information.
-d
# Log memcached's output to /var/log/memcached
logfile /var/log/memcached.log
# Be verbose
# -v
# Be even more verbose (print client commands as well)
# -vv
# Start with a cap of 64 megs of memory. It's reasonable, and the daemon default
# Note that the daemon will grow to this size, but does not start out holding this much
# memory
-m 64
# Default connection port is 11211
-p 11211
# Run the daemon as root. The start-memcached will default to running as root if no
# -u command is present in this config file
-u memcache
# Specify which IP address to listen on. The default is to listen on all IP addresses
# This parameter is one of the only security measures that memcached has, so make sure
# it's listening on a firewalled interface.
-l 127.0.0.1
# Limit the number of simultaneous incoming connections. The daemon default is 1024
# -c 1024
# Lock down all paged memory. Consult with the README and homepage before you do this
# -k
# Activate modern optimal configuration
-o modern
Ctrl+X, Y and Enter to Save
You can check the memcached version using the new built-in command
memcached -VNow the Memcached version is displayed
memcached 1.4.26Now we just need the latest C extension for PHP5 called pecl memcached so PHP can interface with the memcached daemon through the libmemcached C extension.
Build the Latest PECL PHP Memcached Extension
Install git so you can grab the latest version of memcached
sudo apt-get install build-essential git php5-igbinary php5-json php5-msgpack php5-dev pkg-config -yEnter the temporary directory and grab the latest php-memcached extension source code
cd /tmp
git clone https://github.com/php-memcached-dev/php-memcached
Enter the source directory, compile and install it, if you do not want SASL (authentication) support remove the –enable-sasl
cd php-memcached
phpize
./configure --prefix=/usr --enable-igbinary --enable-json --enable-msgpack --enable-sasl
make
make install
You should eventually see that it was successful
Installing shared extensions: /usr/lib/php5/20131226/All that is left to do is enable the memcached php extension.
Add the memcached extension
echo "extension = memcached.so" | sudo tee -a /etc/php/7.0/mods-available/memcached.iniSince I use php5-fpm with nginx I am symlinking into the php5 fpm and cli folders.
sudo ln -s /etc/php5/mods-available/memcached.ini /etc/php5/fpm/conf.d/30-memcached.ini
sudo ln -s /etc/php5/mods-available/memcached.ini /etc/php5/cli/conf.d/30-memcached.ini
Apache2 users will want to symlink this file
sudo ln -s /etc/php5/mods-available/memcached.ini /etc/php5/apache2/conf.d/30-memcached.iniNow restart php5-fpm or Apache
sudo service php5-fpm restart
sudo service apache2 restart
I recommend using the free Memcached is your friend plugin with fixes to prevent plugin and PHP crashes.
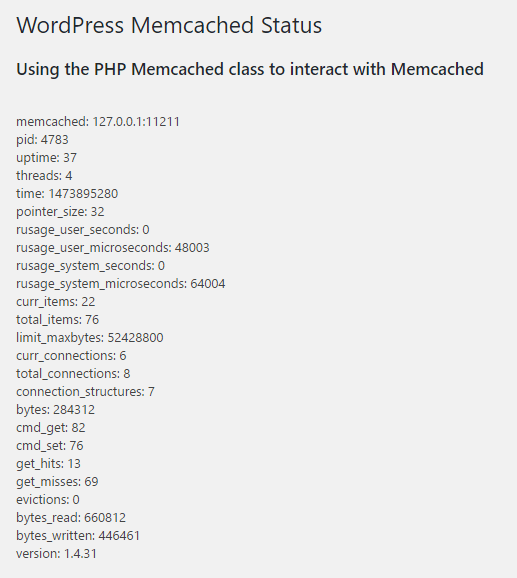
You can find the WordPress Memcached status under Tools > Memcached.
1 thought on “Install Latest Memcached Object Cache WordPress PHP5 Debian”
Comments are closed.