
Cloudflare helps speed up WordPress and WooCommerce sites all around the world. Powered by more than 100 datacenters globally, Cloudflare’s CDN and security is a great addition to any web site. By default Cloudflare will cache a lot of your static assets which help decrease load times. If you want to speed your site up even further then experimenting with Cloudflare page caching for WordPress is worth exploring. This is especially useful for people who find their TTFB (Time to First Byte) has slowed down after using Cloudflare.
The goal of this tutorial is to show you how to reduce your server response time (TTFB) around the world using Cloudflare’s datacenters on the Free and Pro plan.
Business and Enterprise plans with Cloudflare let you bypass cache on cookies which makes things a bit easier, but these plans start at $200 per month.
Note: this should be considered experimental and tested on a staging/development site.
Random weird behavior can happen with edge caching, be careful!
Cloudflare Cache WordPress Posts and Pages Guide
Overview
- Benchmarks with and without page caching
- Configure Cloudflare page cache
- Testing Cloudflare page cache
- Troubleshooting Cloudflare page cache
Cloudflare Page Cache for WordPress Benchmarks
This site is running on a Vultr (was Digital Ocean) VPS in Europe so I chose to test from Australia on pingdom.
Note that these benchmarks are without a warmed up Cloudflare CDN. The primary goal of these benchmarks is to show the server response (Time to First Byte – TTFB) benefits
Without Cloudflare Page Cache
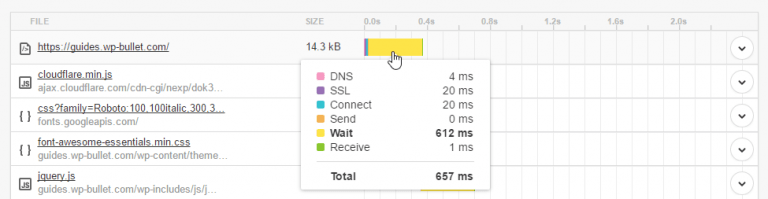
The first test took 2.35s – note that the Cloudflare CDN was not warmed up for this test!

The Time to first Byte (TTFB) before Page caching with Cloudflare was 657 ms
After Cloudflare Page Caching
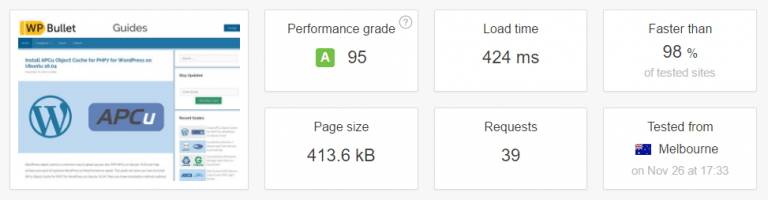
After enabling Cloudflare page caching the site took 424 ms to load. At this point the Australian datacenter has my static assets and HTML.
The Time to first Byte (TTFB) after Page caching with Cloudflare went down to 43 ms
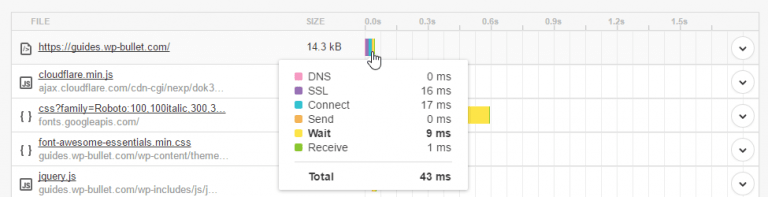
This demonstrates the benefits of page caching with Cloudflare, going from a TTFB of 657 ms to 43 ms is a massive improvement of 15x faster.
Note: it is very likely with a TTFB that low that the pingdom server is in the same datacenter as Cloudflare’s servers.
Configure Cloudflare Page Cache
Sign in to Cloudflare go to Page Rules in the top navigation.
Create a Page Rule where If the URL matches is your full domain name with a /* at the end like https://guides.wp-bullet.com/*
The setting is Cache Level and should be set to Cache Everything
Click Save and Deploy

Create another page rule for https://guides.wp-bullet.com/wp-admin/* and set Cache Level to Bypass.
Click Save and Deploy

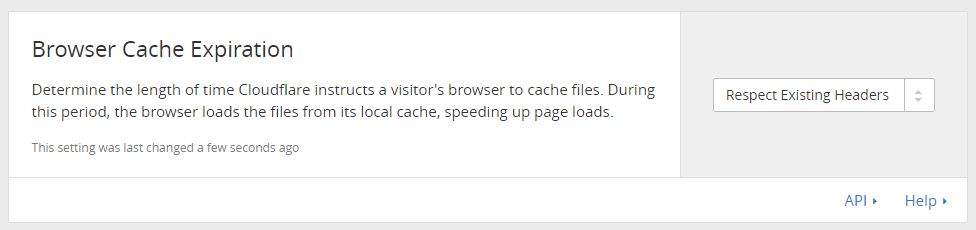
Under the top level menu Cache, set Browser Cache Expiration to Respect Existing Headers this will tell Cloudflare to respect the max-age of our Cache-Control header.
I would highly recommend reading more about how Cloudflare works with origin cache control.
Once enabled you can scale with Cloudflare very beautifully!

Testing Cloudflare Page Cache
Using cURL or even pingdom can show you if the CF-Cache-Status header is set. The first time the page is accessed it will be a MISS.
Testing with cURL
To send a cURL HEAD request use this command from a linux command line.
curl -I https://guides.wp-bullet.com/Notice the CF-Cache-Status header in the output
HTTP/1.1 200 OK
Date: Tue, 15 Nov 2016 09:32:01 GMT
Content-Type: text/html; charset=UTF-8
Connection: keep-alive
Set-Cookie: __cfduid=d7f5d39ef87df866a7ed2fd85399064cb1479202321; expires=Wed, 15-Nov-17 09:32:01 GMT; path=/; domain=.wp-bullet.com; HttpOnly
Link: <https://guides.wp-bullet.com/wp-json/>; rel="https://api.w.org/"
Vary: Accept-Encoding
X-Varnish: 558612 3
Via: 1.1 varnish-v4
Access-Control-Allow-Origin: http://guides.wp-bullet.com
X-Frame-Options: SAMEORIGIN
X-XSS-Protection: 1; mode=block
X-Content-Type-Options: nosniff
Strict-Transport-Security: max-age=31536000; includeSubDomains; preload
X-Cache: HIT
CF-Cache-Status: MISS
Expires: Fri, 16 Dec 2016 09:32:01 GMT
Cache-Control: public, max-age=2678400
Server: cloudflare-nginx
CF-RAY: 3021b19009fe63c1-FRA
If you repeat the pingdom test or use cURL you will see the CF-Cache-Status header change to HIT if everything is working correctly.
HTTP/1.1 200 OK
Date: Tue, 15 Nov 2016 09:32:05 GMT
Content-Type: text/html; charset=UTF-8
Connection: keep-alive
Set-Cookie: __cfduid=d17975371e9adf5c8d82848b58590d96d1479202325; expires=Wed, 15-Nov-17 09:32:05 GMT; path=/; domain=.wp-bullet.com; HttpOnly
Link: <https://guides.wp-bullet.com/wp-json/>; rel="https://api.w.org/"
Vary: Accept-Encoding
X-Varnish: 558612 3
Via: 1.1 varnish-v4
Access-Control-Allow-Origin: http://guides.wp-bullet.com
X-Frame-Options: SAMEORIGIN
X-XSS-Protection: 1; mode=block
X-Content-Type-Options: nosniff
Strict-Transport-Security: max-age=31536000; includeSubDomains; preload
X-Cache: HIT
CF-Cache-Status: HIT
Expires: Fri, 16 Dec 2016 09:32:05 GMT
Cache-Control: public, max-age=2678400
Server: cloudflare-nginx
CF-RAY: 3021b1a37dea6499-FRA
Testing with pingdom
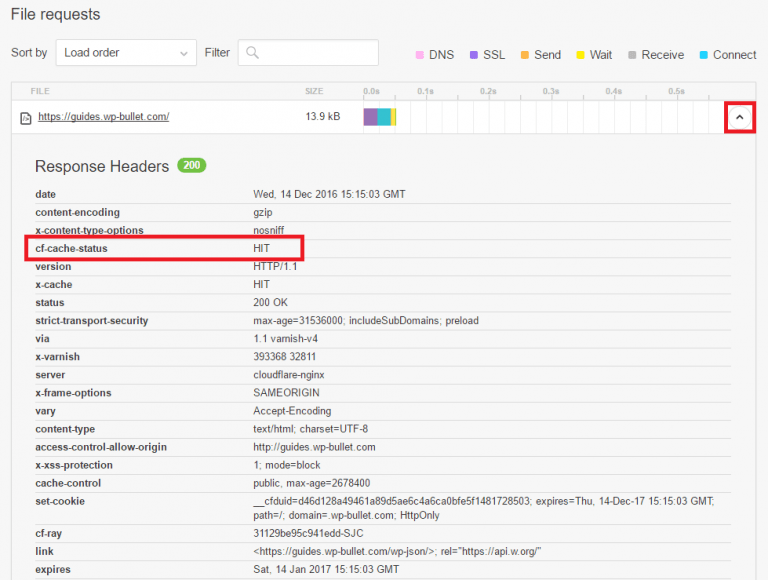
You can also examine the response headers using pingdom. Find the first response and click the arrow in the top right.
Look for the cf-cache-status header and it should show HIT.
If you are still seeing MISS after repeated attempts, then you may need to remove some headers which prevent caching and add some cache headers. This requires a custom plugin like the one shown below which I used Pluginception to create or modifying .htaccess, both methods are shown below.
Troubleshooting Cloudflare Page Cache
Essentially if you have Pragma: no-cache or Expires set in the past then Cloudflare will not cache those pages.
You must have a Cache-Control header set that Cloudflare’s servers will respect.
If you are using JetPack login then you should add a Cloudflare page rule to bypass caching for domain.com/wp-login.php* (thanks Eric).
Custom Plugin for Setting Cache-Control Headers
Using Pluginception you can create a custom plugin like the one below which removes the Pragma, Expires and Cache-control headers.
It then adds the Cache-control header, here it is 3600 seconds which is 1 hour.
//Disallow direct access
defined( 'ABSPATH' ) or die( 'No Access' );

add_action( 'send_headers', 'remove_headers', 10000 );
function remove_headers() {
    if ( is_admin() ) {
        return;
    }
    header_remove('Pragma');
    header_remove('Expires');
    header_remove('Cache-Control');
    header('Cache-Control: max-age=3600');
}
If the above doesn’t work you can try with this custom plugin instead
//Disallow direct access
defined( 'ABSPATH' ) or die( 'No Access' );

add_filter( 'wp_headers', 'remove_headers', 10000 );
function remove_headers( $headers ) {
    unset($headers['Pragma']);
    unset($headers['Expires']);
    unset($headers['Cache-Control']);
    $headers['Cache-Control'] = 'max-age=3600';
    return $headers;
}
Activate the plugin and re-test.
Fix Previews Showing as Cached
The typical URL for preview pages in WordPress looks like this https://guides.wp-bullet.com/?p=6336&preview=true and in this format it will be cached by Cloudflare since there is no exception set for it. You have two choices to fix this undesirable behavior:
Option 1 – Create a page rule to bypass the cache for URLs containing https://guides.wp-bullet.com/*&preview=true
Option 2 – Create a mini plugin using Codesnippets or something similar to dynamically add a unique query string to preview pages so the preview URL becomes https://guides.wp-bullet.com/?p=6336&preview=true&no-cache=1549977754. The snippet below works well on this site:
//add random timestamp to preview links
function add_no_cache_timestamp($url) {
   $slug = basename(get_permalink());
   $mydomain = 'https://guides.wp-bullet.com';
   $mynewpurl = "$mydomain$slug&preview=true&no-cache=" . time();
   return "$mynewpurl";
}

add_filter( 'preview_post_link', 'add_no_cache_timestamp' );
add_filter( 'preview_page_link', 'add_no_cache_timestamp' );
Fix Disappearing WordPress Admin Toolbar
In general you should not be viewing your published posts and pages while logged in as this will cache the admin toolbar view!
If you find the admin toolbar has disappeared you can bring it back with this snippet in a custom plugin.
//Disallow direct access
defined( 'ABSPATH' ) or die( 'No Access' );

function wpb_bring_admin_back() {
    if ( is_user_logged_in() ) {
        add_filter( 'show_admin_bar' , '__return_true' );
        show_admin_bar( true );
    }
}

add_action( 'wp_loaded', 'wpb_bring_admin_back', 10000 );
If you only want the admin toolbar to work for admins this should do the trick.
//Disallow direct access
defined( 'ABSPATH' ) or die( 'No Access' );

function wpb_bring_admin_back() {
    if ( is_user_logged_in() && current_user_can('manage_options') ) {
        add_filter( 'show_admin_bar' , '__return_true' );
        show_admin_bar( true );
    }
}

add_action( 'wp_loaded', 'wpb_bring_admin_back', 10000 );
Hopefully this helps display your admin toolbar only where it should be shown!
.htaccess Method
Open up your .htaccess file and add this snippet at the bottom
# Begin Cloudflare headers for page cache
<IfModule mod_rewrite.c>
RewriteCond %{REQUEST_URI} !/wp-admin [NC]
RewriteCond %{HTTP_COOKIE} !"wordpress_logged_in"
RewriteRule ^.*$ - [ENV=LONGCACHE:true]
<IfModule mod_headers.c>
Header unset Pragma env=LONGCACHE
Header unset Expires env=LONGCACHE
Header set Cache-Control "max-age=600" env=LONGCACHE
</IfModule>
</IfModule>
# End Cloudflare headers for page cache
Save the .htaccess file and re-test Cloudflare page caching.
nginx Cache Headers
To remove headers with nginx you need the more_headers module which is included with the nginx-extras package on Debian and Ubuntu.
In your nginx virtual host add this if statement location block (untested)
location ~* "(!?.*wp-(admin|login)\.php.*)" {
    #remove headers that prevent Cloudflare page cache
    more_clear_headers 'Pragma';
    more_clear_headers 'Expires';
    more_clear_headers 'Cache-Control';
    add_header Cache-Control "max-age=3600";
}
Reload nginx and test if the page is cached by Cloudflare now.
Don’t forget to install the WordPress Cloudflare plugin so the page cache will be automatically cleared when you update your site.
Sources
Cloudflare Custom Caching Options Explained
Cloudflare Cache Everything
Remove HTTP Headers in .htaccess
Conditionally Set Cache Headers in Apache
Set headers Conditionally Stackoverflow
Conditionally Set Headers in Apache
nginx Clear Headers
Add nginx Headers
Cache Control Headers
Would love to see those nGinx configs. 🙂
Hey Budd, will update it with nginx method as well a bit later.
Disqus,
Thank you for contacting our support team. A support ticket has now been opened for your request. You will be notified when a response is made by email. The details of your ticket are shown below.
Subject: Re: Comment on Cloudflare Cache WordPress Posts and Pages Guide
Priority: Medium
Status: Open
You can view the ticket at any time at https://www.goiww.com/clients/viewticket.php?tid=158937&c=Mn7c6oIV
Budd Grant
Incendia Web Works
Does this take in to account the admin bar when in the frontend/you’re logged in
Good question Andy, it seems to depend on the site and is something I am looking to more precisely control.
Hey Andy, managed to fix it on my end. Post has been updated with 2 admin bar fixes. Let me know if they work for you too.
Thanks for the guide,
Everything seems to load faster but browser cache is not working now. I’m using W3 total cache and everything in the settings is correct. Also double checked .htaccess, but gtmetrix and pingdom tools keep on saying expiry date is 10min to 1hour on images (jpg, png and svg).
Do you have an idea what it could be mike?
Caching with W3TC and Cloudflare can be tricky. You’d have to look at the .htaccess rules for svg and images, there could be an nginx proxy changing or overriding those headers.
rules is correct and has been working until i changed the CloudFlare’s Browser Cache Expiration to Respect Existing Headers.
I implemented Cache Everything on my sites a few months ago. I found this guide as I was searching for a way to add the toolbar back if logged in as admin. I tried your approach using wpb_bring_admin_back() but this didn’t work.
First I started with a clean page (no cache).
Hit the page as a logged-in user = toolbar shows. Great.
Make a couple of CURL requests to the same page (or via an incognito window). Now this is cached at Cloudflare.
Visit the page again as a logged-in user – toolbar is missing. Bummer.
Hey Anthony, when you visit the page as a logged in user and see the toolbar missing, had you made a new tab and pasted the URL and pressed Go? I have noticed this behavior before and I found out it’s actually expected. You can test it by staying logged in to the site’s posts page and do your cURL requests, then using the admin dashboard open the post by right-clicking on view and opening in a new window. You should see the toolbar because the cookie is set, for the URL we just paste into a new tab the cookie isn’t set so you don’t get the toolbar since you’re served the CF cached version.
Great write up!
Want to follow up, if I am wanting to detect cookies of woo-commerce (ie what if somebody ads an item to their shopping cart) how do i handle that in .htaccess or nginx?
Thanks!
Sorry for the delayed reply here Ben, the WooCommerce version is more complex and there may be a guide on it eventually. If you still would like this done feel free to get in touch via my contact form 🙂
Hai. I have implemented these tutorial on my website.. After this, my sites homepage only loading.. Post pages are not loading.. I’m getting 404 page can’t be found..
Hi Navaneetha, sounds like a permalink issue or .htaccess problem, may want to check there
Hai.. Thanks for your response.. The Problem caused by htaccess..Now the Problem is fixed.. But i have another issue.. Sometimes The CF-Cache-Status shows expired in pingdom and GT Metrix.. How to fix this…
Excellent find Anthony!
Hi Mike thank you for your tutorial. I have a question. I have implemented your suggestion with Apache e .htaccess. all works fine but if an user make a Login and navigate page that him navigate before do login it see the cache page and not the server page. It is normal? It is not possible override header for cached visited page?
if you want to make a test I can share the link with you 🙂
graphic-cv.com
I’m caching my images, css, js etc. with Cloudflare.
When I do the test first time it will be a MISS, next time a HIT. If I repeat it after some minutes it will be MISS again. Sometimes I see cache expired, even though it’s set to expire in months. I don’t know what is going on, why are my images constantly showing up as MISS first time I metrix them or test with curl?
This very likely has to do with the cache-control headers set on the origin server and/or the Cloudflare settings for expiration (they can override the host’s cache-control headers)
Hey Mike, I followed the guide and cached my html using cache everything.
My page loads much quicker now!
The only issue is i’ve noticed when i repeatedly view a page the TTFB is low (around 40ms) and page loads quickly.
But if i visit that page again, say in 30 mins, TTFB goes way up to around 600-800ms
My cf-cache-status is always HIT as i have the cache control set for 1 month.
Do you have any idea what could be causing my TTFB to go up so much like that?
Hi there, I am using Debian 9 and nginx/1.13.3 with –add-dynamic-module=/build/nginx-1.13.3/debian/modules/headers-more-nginx-module
Using this rule:
if ($http_cookie ~* “wordpress_logged_in|wp-.*|comment_.*”) {
more_clear_headers ‘Pragma’;
[…]
I am getting:
nginx: [emerg] “more_clear_headers” directive is not allowed here in /etc/nginx/sites-enabled/mywebsite.com.conf:70
Any help?
My best regards
Hey Davide, the nginx rules were never tested but it looks like the reason that is happening is because the more_clear_headers directive is not allowed outside a location block, you will have to put it inside the php location block.
I will try soon. My very best.
If I use Cache everthing will it affect Adsense earnings? Also can you share your cloudflare settings if you dont mind?
Great article. Does this also apply in 2019? I am on Managed WordPress Hosting called Dreampress they have server side Proxy cache called Varnish. Any special rules for that?
Thanks for your great article. However, I have encountered a problem with this working with AMP redirect for mobile users. When cache everything is enabled, cloudflare would just send the cached original site instead of the AMP site to users, and this would lower my google pagespeed score by a lot. Do you have any recommendations on the issue? Thanks!
Just want to say thank you. This helps me a lot.
Went to 2.2seg to 231ms on gtmetrix test.