
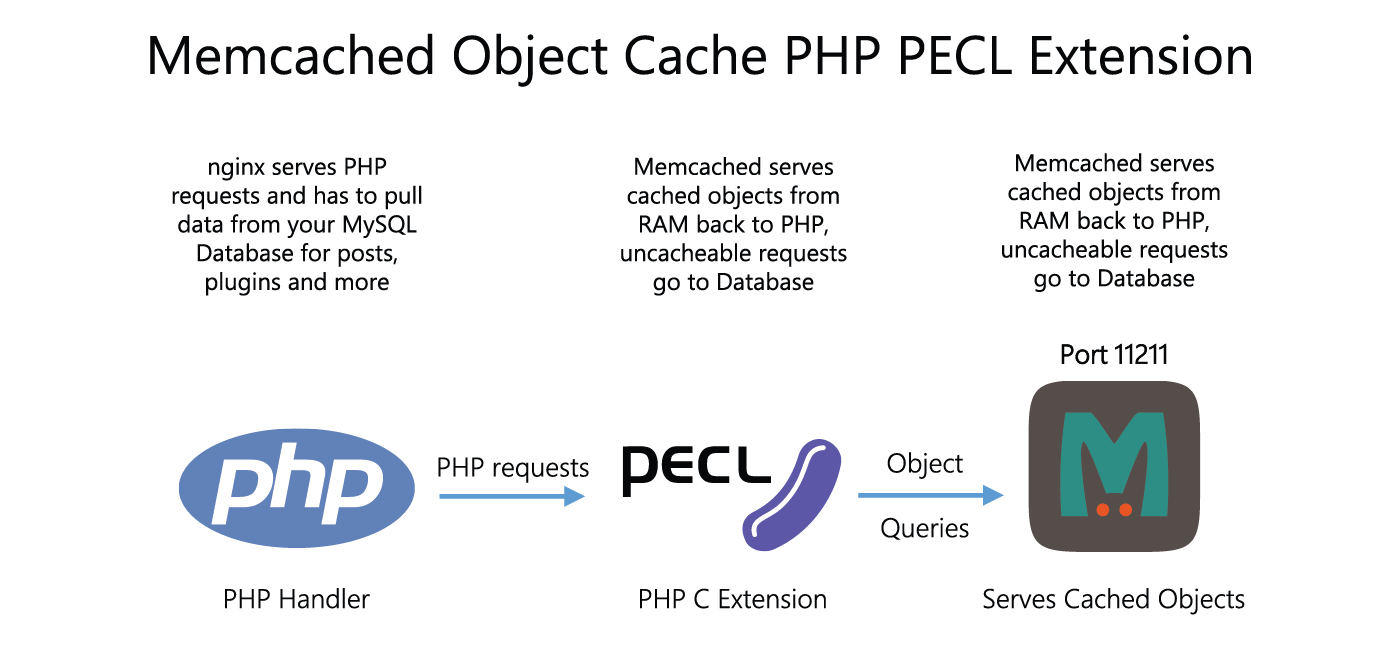
Object cache is a way to cache transients set by plugins and themes. Default WordPress object cache uses the MySQL database which we all know can get bogged down. This led developers to seek out alternatives to store these transients elsewhere to speed up the WordPress backend experience. Redis and Memcached are two popular options for object cache daemons that store transients in RAM. This tutorial shows you how to install the Memcached server and the PHP 7 extension so that WordPress can interface with the Memcached server.
Install Memcached Object Cache for WordPress PHP 7 on Ubuntu 16.04
Memcached Installation Overview
- Install the Memcached daemon
- Install the Memcached PHP extension
- Install a Memcached object caching plugin
Install Memcached Server
Install the latest Memcached daemon and dependencies from the repository.
sudo apt install libmemcached* memcached libanyevent-perl libyaml-perl libterm-readkey-perl libevent-dev libsasl2-2 sasl2-bin libsasl2-dev php7.0-dev php7.0-json php-igbinary php-msgpack pkg-config libtool-bin build-essential git -yNow to make sure we have the latest memcached we are going to build from source.
This will grab the latest Memcached source package from the official website.
MEMCACHELATEST=$(wget -q https://www.memcached.org -O - | grep tar.gz | awk -F "[\"]" '{print $2}')
cd /tmp
wget -q $MEMCACHELATEST -O memcached.tar.gz
tar -xf memcached.tar.gz
cd memcached*
./configure --prefix=/usr --enable-sasl
sudo make
sudo make install
These next 3 lines are required for if you want to use unix sockets which provide a speed boost according to benchmarks.
You’ll get permission issues with nginx and php7.0-fpm if the www-data user doesn’t have execute access. Other tutorials will tell you to set the permissions to world read, write and execute access. This method sets the primary group of the memcache user to the www-data group and sets the folder containing the unix socket to allow the www-data group read, write and execute permissions which is more secure.
sudo usermod -g www-data memcache
sudo mkdir -p /var/run/memcached
sudo chown -R memcache:www-data /var/run/memcached
Configure Memcached for WordPress
Back up the original Memcached configuration file
sudo mv /etc/memcached.conf /etc/memcached.conf.bakCreate a new Memcached configuration file
sudo nano /etc/memcached.confPaste this memcached conifguration.
# Run memcached as a daemon. This command is implied, and is not needed for the
# daemon to run. See the README.Debian that comes with this package for more
# information.
-d
# Log memcached's output to /var/log/memcached
logfile /var/log/memcached.log
# Be verbose
# -v
# Be even more verbose (print client commands as well)
# -vv
# Start with a cap of 64 megs of memory. It's reasonable, and the daemon default
# Note that the daemon will grow to this size, but does not start out holding this much
# memory
-m 50
# Default connection port is 11211
-p 11211
# Run the daemon as root. The start-memcached will default to running as root if no
# -u command is present in this config file
-u memcache
# Specify which IP address to listen on. The default is to listen on all IP addresses
# This parameter is one of the only security measures that memcached has, so make sure
# it's listening on a firewalled interface.
-l 127.0.0.1
# Set unix socket which we put in the folder /var/run/memcached and made memcache user the owner
#-s /var/run/memcached/memcached.sock
# set permissions for the memcached socket
#-a 775
# Limit the number of simultaneous incoming connections. The daemon default is 1024
# -c 1024
# Lock down all paged memory. Consult with the README and homepage before you do this
# -k
# Activate optimal options
-o modern
Ctrl+X, Y and Enter to Save and Exit
Open the Memcached init.d configuration file
sudo nano /etc/default/memcachedEnsure these lines are present so that the Memcached daemon starts.
# Set this to no to disable memcached.
ENABLE_MEMCACHED=yes
Restart the Memcached daemon.
sudo service memcached restartInstall Memcached PHP 7 PECL Extension
Compile the Memcached PHP 7 PECL extension
sudo apt install php7.0-dev libtool pkg-config php-igbinary php-json php-msgpack -y
cd /tmp
git clone https://github.com/php-memcached-dev/php-memcached -b php7
cd php-memcached
libtoolize
phpize
./configure --prefix=/usr --enable-memcached-igbinary --enable-memcached-json --enable-memcached-msgpack
sudo make
sudo make install
Enable the PHP 7 extension for nginx or Apache.
Add the memcached extension
echo "extension = memcached.so" | sudo tee -a /etc/php/7.0/mods-available/memcached.iniEnable the memcached extension with a symlink for php7.0-fpm and the cli (command line)
sudo ln -s /etc/php/7.0/mods-available/memcached.ini /etc/php/7.0/fpm/conf.d/30-memcached.ini
sudo ln -s /etc/php/7.0/mods-available/memcached.ini /etc/php/7.0/cli/conf.d/30-memcached.ini
Restart the php7.0-fpm daemon
sudo service php7.0-fpm restartApache2 users will want to symlink this file
sudo ln -s /etc/php/7.0/mods-available/memcached.ini /etc/php/7.0/apache2/conf.d/30-memcached.iniRestart Apache2
sudo service apache2 restartNow we can install the Memcached plugin that works with PHP7.
Install Memcached WordPress Plugin
The best free option is the fixed Memcached is your friend which I forked and put on github.
If you want to use Memcached is your friend with unix sockets see this guide.
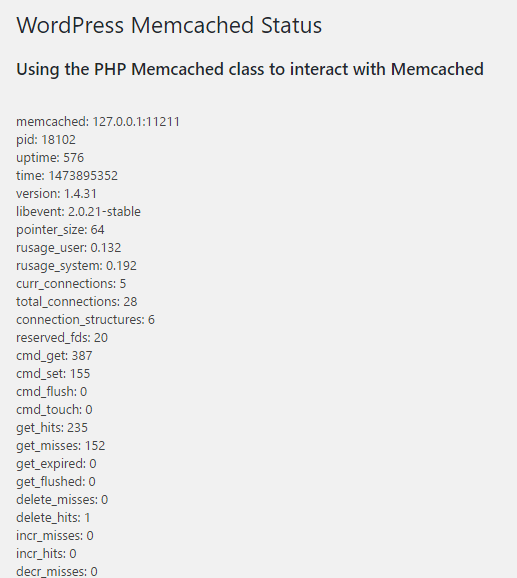
Under Tools > Memcached you can see the statistics.
It’s wise to point out that the plugin found at https://github.com/wpbullet/memcached-is-your-friend
Doesn’t work with multisite installations when using memcached which is required for PHP 7 as the PECL for memcache does not yet work with PHP 7.
Unfortunately the github repo does not allow for issues to be raised so this comment can’t be added there.
The issue with mutlisite is that the object cace is not cleared on a switch_to_blog command, therefore the cache for the primary website is always returned instead of the cache for the subsite
Thanks Craig, although I usually recommend against multisite this is still important to know and I appreciate you bringing it to my attention. I will make sure to get this fixed sometime in the future.
installed
Hope it helps Rohit 🙂
why don’t see statistics Under Tools > Memcached ,moreover the query Become Larger?this php7 and nginx?
I see statistics under Tools > Memcached. I do not know what you mean by query becomes larger dadu, can you elaborate?
Which one object cache will be faster for wp ? memcached or apcu ? or they play different roles?